

Planting and Location | Irrigation
Trees and Shrubs | Groundcover, Perennials, Vines, and Ornamental Grasses | Lawns
Composting | Vegetable Gardens
PLANTING AND LOCATION
A beautiful landscape is a vital part of your home and community. A well-planned landscape can save you money by reducing energy consumption. It also improves the quality of your local stream or pond and becomes a delightful place to spend your time.
PLANNING AHEAD
Before you start to dig, it is wise to plan. The law requires you to call MISS Utility before starting major excavations. Look around your property and assess its physical conditions — what is shaded, what is rocky, where is it windy, where is the grass soggy day after day. If the project is larger than you can handle, hire a gardener, landscape designer, or landscape architect, or work with the staff from a local nursery to develop a plan.
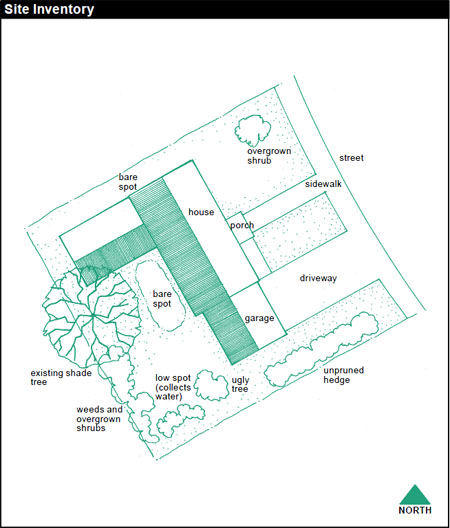
A simple sketch of your property showing the location of buildings, driveways, sidewalks, streets, terraces or decks, septic fields, and trees, shrubs, gardens, and lawns is a good starting point.
You can make your own custom plan with these three easy steps. Before starting, collect a ruler, a tape measure, and several copies of graph paper. If you don’t have a long tape measure, a 25 foot or 50 foot long garden hose or measured piece of string will work. This sketch is useful for making an inventory of any trouble spots you might have or places you want to preserve. Keep the sketch and add changes you make over time.
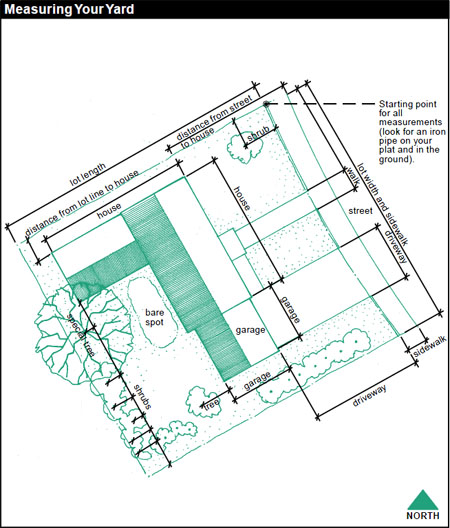
Step One: Start with your builder’s plan or a copy of your plat plan. These plans diagram the shape of your lot, its dimensions, where your house, sidewalk, driveway, and garage are located, and any easements you will need to avoid.
Step Two: Measure your lot and home. Use a long tape measure, your garden hose, or string. The dimensions or locations shown on the builder’s plan may have changed during construction. If you have such plans, double check their measurements.
Step Three: Draw your home, garage, driveway, sidewalk, pool, patio, and other features on the graph paper you copied from this book. You will have to convert your measurements to make a scaled drawing. Use an ordinary ruler or a special scaled ruler known as an engineer’s scale. The unit of measurement for your diagram is an inch. As long as you are consistent, you can equate any number of feet with one inch.
If you have a small lot, equate 10 feet with every inch on your ruler. On a large lot, you might need to equate 30 feet with every inch on your ruler.
WHAT DO YOU WANT AND HOW DOES IT FIT?
Make a wish list of items you would like to include in your design. Perhaps you have always wanted a pond. Do you have enough space? What is the drainage pattern? Are your soils appropriate? Or perhaps you want to grow fruits and vegetables. Where is a sunny spot?
It is okay to make changes to an existing landscape. Perhaps that tiny holly tree you planted ten years ago at the corner of your house is now threatening to obscure your front door. Or those lovely shrubs that were so appealing when they were 3 feet tall now cover your kitchen window and block the morning sun. One of the delights of growing things is the element of surprise every living thing presents. But some surprises wear better than others. Be bold and take charge. The only caution is if you are new to an established landscape, consider waiting a year before making changes. During that year, study the land and its plants. Learn what blooms when, where sun travels through the day and the seasons, and what remains shady and cool or cold year round. After this year of observation, you can make educated decisions about the appropriate changes to make.
Now that you have made your list, studied your land, and become more eager to improve your site, where do you start? There are many things to consider when choosing a site for the construction of something on your wish list. Walk around your piece of land and note answers to the following questions.
- Do you have wet spots or dry areas? What are the soils like?
- Are there any spots protected from wind or hot summer sun? Do you have frost pockets? What are the microclimatic conditions?
- Does your land tilt? Are your slopes steep?
- What direction does your land face? Does it mostly receive hot sun in the late afternoon?
- Where do people walk?
- Where do you have good views? Where are the views you don’t enjoy as much?
- Do you have utilities on your land?
- Where does the rain go when it falls on your land? Do you have any erosion problems?
Matching your wish list with the specific conditions of your land will get you started.
CHOOSING PLANTS
“Choose the right plant for the right place” are words to guide your plant selection process. Factors that will influence this decision include your climatic zone (Virginia falls in Zones 5, 6, 7, or 8 — see drawing on page 3); specific site conditions and the plant’s hardiness; the potential size and growth rate of a particular species; and a plant’s shape, form, and texture. A tree that is petite and dainty at planting time may grow into a 100-foot towering specimen. A fast-growing tree may be weak wooded and short-lived. As always, watch out for mail-order plants that seem too good to be true; they probably are. Your best bet is to find a local nursery with a knowledgeable staff and use reputable mail-order sources for more unusual species.
Plants are known by both a botanical name and a common name. The botanical name is in Latin and most often consists of two words: the genus and the species, sometimes followed by a variety. Frequently, the same plant has several common names. If you don’t use the botanical name when selecting and purchasing plants, you may be surprised later when it blooms. For example, you might call a nursery and ask for a Burning Bush. Instead of a shrub commonly known as Burning Bush (Euonymus alatus), you might get there and see a perennial known as Burning Bush (Dictamnus albus). To help you avoid this problem, the plant tables give both a common and a botanical name.
PLANTING FOR A REASON
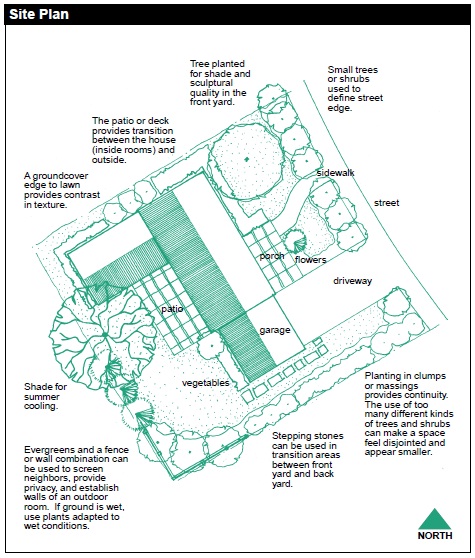
Plantings serve many uses. Planting for a reason is a cost-effective use of your time, labor, and money. Specific plant genus and species appropriate for the following applications are listed in the plant tables.
Planting a Screen or Windbreak: A screen or windbreak planting provides privacy and protection for your yard, porch, or garden. Plantings reduce your home’s energy consumption by providing shade, reflecting solar rays, and providing barriers to snow, rain, and wind. Selecting the appropriate plant is critical to the long-term success of your screen or windbreak. The wrong plant may overwhelm the site and be expensive to remove. Remember to think of your neighbors and the effects of your planting on their properties.
Planting in a Wet Spot: Sometimes it is better to accept your site’s drainage conditions than to try to change them. If you have a soggy spot, choose plants that thrive with wet feet. You may even want to redirect your excess storm runoff to this low spot and allow the water to slowly seep into the ground.
Planting on Slopes: Hillsides or sloped areas provide different conditions that may affect plant selection and growth. Soils on hillsides can be excessively well-drained, providing little moisture to plants. Often, hardy erosion-control shrubs are needed. A north- and east-facing slope will receive considerably less sunlight and be much cooler than a south- and west-facing slope which will be hot and dry.
Planting for Erosion Control: Areas that have been disturbed need protection with fast-growing grasses, groundcovers, or mulch.
Planting for Wildlife: Conservation actions for wildlife habitat improvement can be incorporated in any planting. These plantings may reduce the need for fertilizers and pesticides and enhance water and energy savings. Maintenance requirements can be reduced if you allow the plants’ natural form to be exhibited. Group the plantings as they are found in the wild: an understory of shrubs and small trees, a forest floor covered with perennials and groundcovers, all beneath a forest canopy of tall trees. Plant a hedgerow of mixed species for a screen or in an area that gets little use. Plants adapted to the local climatic and soil conditions are likely to be more resistant to disease. Chemical controls are rarely needed. As few as three trees around your home can cut air conditioning bills in half.
Planting for Pedestrian Traffic Control: The right plant can provide a barrier to unwanted foot traffic. Plants with thorns, dense and twiggy shrubbery, and mounded groundcovers can guide pedestrians to their destinations.
Cover Crops: A cover crop may be required for larger areas or in a winter garden. These crops, referred to as green manure, can add organic matter to the soil, improving fertility if left in place for six months to a year. Legumes are especially efficient because they “fix” nitrogen from the air into the soil. After the summer garden crops have been harvested and stalks and vines removed, lightly till the garden to prepare a seed bed, incorporating lime and fertilizer if necessary. Cover crops such as rye grass are usually planted in the fall to protect soil from wind and water erosion. Broadcast the cover crop seed, rake lightly to cover it, and then irrigate. Where you have fall crops growing, sow cover crop seeds between rows a month or less before the expected harvest, but not later than November 1. A hardy species that survives the winter will resume growth as the weather begins to warm. Do not let it go to seed. Cover crops and green manure are usually turned under in the spring before planting. If the crop is tall or thick, mow it prior to tilling, especially legumes that may clog machinery. Leave the clippings on your garden, so they also may be turned under to help condition your soil. For large gardens, a rototiller is the most practical way to incorporate any type of cover crop. The crop should be turned under two to three weeks before planting new seed.
Planting to Extend the Microclimate: Do you yearn for a home-grown fig? Fresh rosemary in December? Or do you cherish the rare camellia in February? With a bit of ingenuity, you can extend your area’s climatic zone range. Create a windbreak by planting on the leeward side of a building or wall, sheltering more fragile and delicate plants from cold winter winds. Plant in front of a south-facing wall or slope where the spring and fall sun warms the soil and keeps frosts from damaging sensitive plants.
Return to Index at top of page
IRRIGATION
- Apply a known amount of water with your water system when the soil is relatively dry.
- Wait for the water to soak in fully: one hour for sandy soils, two to four hours for loam and four to six hours for clayey soils.
- Next, dig several small holes, measure the depth of the moist soil, and average the depths. To be less destructive, use a screwdriver, which will easily penetrate the wetted soil and meet resistance in the dry soil below.
- Place several rain gauges at random in the irrigated area for a determined length of time (usually one hour).
- Average the water levels in the gauges and divide it by the length of time to determine your sprinkler rate in inches per hour.
- Water wisely!
Water your lawn and plantings only when needed. Use drip irrigation whenever possible around plantings and match the irrigation level to the specific plant’s needs. Newly transplanted plants will require more water than established plants with a mature root system. Avoid excessive irrigation following the application of chemicals or fertilizers. Runoff could carry these pollutants into nearby streams and drainageways.
Time of Day: Water deeply in the early morning hours. The air is relatively cool and moist, reducing water loss to evaporation. Late evening watering may encourage mildew and disease on plants.
Length of Time: Three factors affect the length of time required for adequate irrigation: the depth of watering, the application rate, and the amount of water needed.
The amount of water needed varies with your soil type. To estimate the amount of water needed, figure the depth of watering and calculate how much water is necessary to wet the soil to the desired depth. Divide the amount of water required in inches by the application rate of your sprinkler to determine the number of hours your system must operate. For example, if your system applies .5 in./hr. and you need to apply 1 inch of water, 1 inch divided by .5 in./hr. equals 2 hours. If runoff occurs, turn the system off for an hour or two, or even a day if necessary, to let the water soak in. Then apply the rest of the water.
Types of Irrigation: Sprinklers are very common and provide even coverage over large areas. However, they can be difficult to use on slopes and often waste water because of the large amount of evaporation that occurs. Sprinklers are hard to control and may cause excessive runoff. Operating sprinklers late in the day may increase plant diseases because the leaves don’t dry quickly without sunlight.
Another type of irrigation places water directly at the plant’s roots, reducing losses to evaporation. This type includes soaker hoses, trickle systems, and drip irrigation. It can be used in irregularly shaped areas, can be precisely calibrated, and reduces weeds by watering only desirable plants. Problems can occur if rodents damage the tubing or the tubing becomes clogged. The system is not easily portable.
Hand watering requires no special equipment and applies water to targeted areas. Often, though, too much water is applied too quickly, which causes runoff and results in underwatering. Plants can be harmed if they do not receive adequate amounts of water slowly. Instead of roots growing deeply, they reach toward the surface, creating a demand for frequent watering cycles. A 5-gallon bucket with small holes in the bottom placed next to the plant will allow water to slowly drain into the soil, encouraging deep root growth. A garden hose turned on very low and left for several hours is an easy way to slowly soak a single planting.
Irrigating with Well Water: If you use well water, be careful to not over-water and cause your well to go dry. Install a low-pressure switch that will automatically shut down the well if too much water is being consumed.
Return to Index at top of page
TREES AND SHRUBS
Trees are the most permanent plants we grow. Many will live and enhance the landscape for 100 or more years if they are given a chance. Because of the relative permanency and importance of trees, take care to select the best tree species for each situation. The wrong tree, or one planted in the wrong spot, can actually detract from the overall landscape. Five to ten years of precious tree-growing time may be lost before the mistake is realized.
PLANTING
Transplant deciduous trees and shrubs in the dormant season while there are no leaves on the plant. Early spring, before new growth begins, is the most favorable time. Evergreens can be planted any time the ground is not frozen, but the optimum time is September or October. March or April is the next best planting time. For best results, transplant younger trees.
Plants are packed for sale in three ways.
Balled and burlapped and container grown plants can be transplanted any time of the year, although the hottest, driest days of summer should be avoided. Bare root plants generally are less expensive and should be planted during the dormant season. If you are unable to plant immediately after obtaining plants, prevent the roots from drying out by watering them and storing them out of direct sunlight in a cool place. Protect bare-root plants by temporarily planting (heeling) them in the soil.
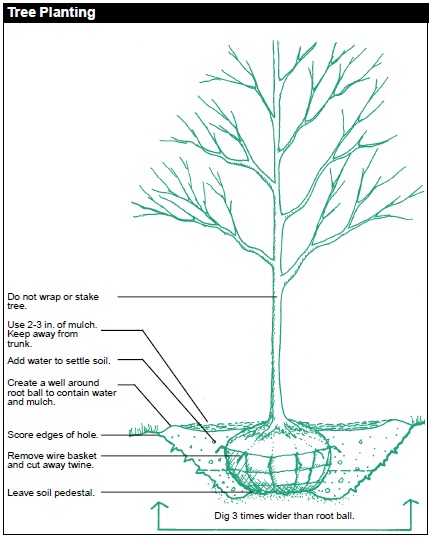
Trees and shrubs need a wide and shallow planting hole. For a tree, dig a hole three times wider than the diameter of the roots or root ball and no deeper than the roots or root ball. Dig a hole twice as wide as the root diameter for a shrub and no deeper than the root ball. NEVER plant it deeper than it was originally. Do not dig, loosen, or amend the soil under the root ball. In poorly-drained, heavy soils, select a plant that will readily adapt to the site. Set the root ball 1 to 2 inches higher than the surrounding soil. Once settling has occurred, the plant will remain above the original soil level. Mound the soil from the existing grade up to the soil level of the tree or shrub where it was originally growing. In areas where water tends to accumulate, select from the limited number of plants that tolerate these conditions, or improve the site with underground drainage, and regrade to alter the surface runoff.
Once the planting hole is dug, remove the pot from container grown plants. Insert a sharp knife about 1/3 of the way into the root ball, make three vertical slits on the sides of the soil, and make an “x” on the bottom. This will encourage new root growth outward into the new soil. If the cuts are not made, the roots will continue growing in a circle around the plant, eventually girdling and killing it. Remove any synthetic material, twine, tags, or wire, and roll back any cotton burlap on balled and burlapped root balls. Do not knock the soil off the root ball. Bare root trees should have the roots spread out in the hole. Firmly pack the soil around the roots or root ball. Heavily water when the hole is 3/4 full of soil to eliminate all air pockets and to provide for better root-soil contact. Fill the hole, building a ring of soil 2 to 3 inches high around the outside edge of the hole to hold moisture. Fill again. Most homeowners over-water newly planted materials. Wait until the top inch of soil has dried before watering again. Remove broken or crossing branches after planting, but wait one or two years for additional pruning.
PRUNING
Pruning is essential for attractive, healthy trees and shrubs and improves the quality of flowers, fruit, and foliage. The best way to avoid difficult pruning jobs is to plan ahead; select plants that will fit available space after the plants have matured to their maximum size.
What Should Your Plant Look Like? The landscape of Virginia’s formal gardens is filled with sheared hedges of hemlock, privet, and boxwood. If this is your model and you must shear, make the bottom of your hedge wider than the top. This will allow the entire surface of the hedge to get sun and continue to grow. In all other cases, a natural shape is best for plants. Thinning a shrub involves the removal of entire branches at their junction with another branch or the trunk. This opens the plant to sunlight and air, encouraging growth from the center of the shrub, while reducing the shrub’s overall size. Most plants respond best to selective pruning. This is healthier for the plant and gives a more natural appearance.
Why Prune a Plant? There are three reasons to prune the plants on your land.
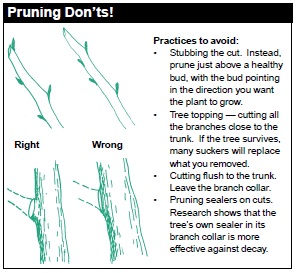
- Training — some pruning may be necessary at the time of planting to shape your tree or shrub. Remove broken and crossed branches but avoid excessive pruning at transplanting as it tends to retard plant growth and inhibit survival.
- Keeping them healthy — pruning is vital for removing dead, dying, or diseased wood. Any dying branch or stub can be an entry point or buildup chamber for insects or diseases, which can readily spread to other parts of the plant.
- Improving flowers and fruit — pruning reduces the amount of old wood in trees and shrubs and thus diverts energy into the production of larger, though possibly fewer, flowers and/or fruit. Properly timed pruning will improve the quality of fruit, foliage, and stems.
When Should You Prune? Most pruning is done in late winter or early spring to give the maximum time for the wounds to heal. However, there are many exceptions. Spring blooming shrubs should be pruned after flowering, but those that bloom in the summer or fall should be pruned in winter. Use renewal pruning on multiple-stemmed plants like forsythia. Young growth produces more vigorous flowers, so each spring after flowering, remove 1/3 of the oldest and tallest stems near ground level to encourage development of new stems. Some shrubs such as roses are reduced in size by pruning individual branches. Trees such as elm, maple, birch, dogwood, and walnut bleed freely if pruned in late winter, so prune them in early summer. Remove dead or diseased wood at any time necessary.
WHAT TOOLS SHOULD YOU USE FOR PRUNING?
Cut branches the size of your thumb or smaller with a hand pruner. Slant the cut to promote healing and prevent the collection of water on the cut. Remove branches over 1 inch in diameter with a pruning saw or lopper. Use the three-cut method to prevent the bark from tearing. Any shearing may be done with hedge shears. Keep your tools sharp to make your work easier and to make smooth, even cuts.
FERTILIZING
Are you wasting money on fertilizer? Gardeners frequently injure their plants with too much or too many applications of fertilizer. Misapplied fertilizer will wash into streams and drainageways and encourage unwanted plant and algae growth in the water. New plants should not be fertilized for 6 to 12 months. Trees in the lawn area may never need fertilizing if a turf fertilizer program is followed. A decomposed organic mulch or compost around plantings is an excellent source of nonchemical fertilizer. A soil test for fertility and pH level will determine the appropriate type and application rate for fertilizing.
Fertilizers are salts, much like table salt, except that they contain various plant nutrients. Nitrogen is important for leaf and stem growth and provides the rich, green color in a plant. Phosphorus provides for root and flower growth. Too much phosphorus will contaminate the local streams and drainageways; it has been banned from laundry detergents for this reason. Potassium helps build plant tissue and aids the production of chlorophyll.
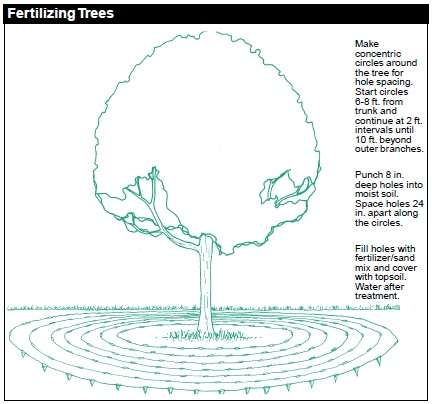
Fertilizing Trees: Trees that are not thriving because of poor soils may respond to moderate applications of fertilizer after the first hard frost in the fall. Measure the diameter of the tree’s trunk 4 feet above the ground. For each inch of diameter, apply 2 pounds of a 5-10-5 formula. Spread the fertilizer over the feeder roots, located in a band around the tree, starting about 6 to 8 feet from the trunk and extending out 10 feet beyond the ends of the branches. Apply water liberally to wash the fertilizer into the ground, using care that the fertilizer does not wash away.
Trees with trunk diameters greater than 3 inches, measured 4 feet above the ground, may benefit from fertilizer placed in holes around the tree. Make the holes with a punch bar when the soil is moist after a period of rain or sprinkler irrigation. For each inch of trunk diameter, mix 3 pounds of 5-10-5 formula with equal parts of dry soil or sand, and distribute in each hole. Water the area to encourage the fertilizer to move out into the soil from the holes. Fill the top portion of each hole with rich garden loam. The treatment should not have to be repeated for several years.
Fertilizing Shrubs: Most shrubs do not require fertilizer to thrive. Don’t fertilize shrubs that are making satisfactory growth. A soil test will indicate when you should add nutrients and in what amounts. However, if soil test information is not available and your plant’s appearance warrants — its leaves are off-green or yellowish and its twigs are short and thin — apply about one cup of a 5-10-5 fertilizer to medium-sized shrubs (4 to 8 feet tall) in the fall after the first hard frost. Small shrubs (under 3 feet tall) need about half this much, and shrubs larger then 8 feet require twice as much. Uniformly apply the fertilizer over the root zone, starting about 6 inches from the base of the shrub and extending out about a foot beyond the ends of the branches. Soak the fertilizer into the ground with a gentle spray of water to avoid burning the plant’s roots with the fertilizer salts. Too much water too fast will wash the fertilizer far from your shrub and send it into nearby streams or drainageways, wasting your money and time and harming the watershed.
If you apply fertilizer in the late summer and early fall before the frost, your plants are likely to have a growth spurt. This will encourage vigorous tender growth late in the season, which may be killed by cold weather in early winter. A dry summer followed by a rainy autumn may also promote late growth that is tender to cold. Such conditions may also cause flowers to open in the fall on shrubs that typically bloom in the spring.
MULCHING
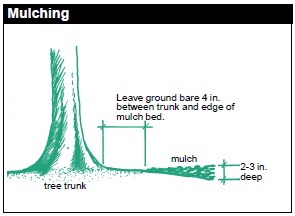
Mulching reduces weeds, prevents erosion, moderates the soil temperature, and helps maintain soil moisture. Many materials are suitable for mulch. Organic materials such as shredded bark, peat moss, leaves, pine straw, and wood chips are commonly used. There are some artificial materials available.
When mulching, leave 4 inches clear around the trunk of larger plants, and maintain no more than 2 to 3 inches of mulch around your trees and shrubs. Excessive mulching provides an excellent home for mice that will feed on and kill your plants during the winter. Feeder roots will tend to grow in the mulch and will be more susceptible to drought and winter freezing.
PROTECTING TREES AND SHRUBS
Construction Sites: Protect your landscape from damage during construction. The following actions may result in injury to trees and shrubs.
- Addition of soil to, or the removal of soil from, the tree’s root zone
- Storage of fill under your trees
- Compaction of soil
- Physical damage to trunk and branches
- Change in groundwater table
The spring before construction begins, fertilize and prune. Prior to beginning construction, erect a fence (snow fencing, plastic netting, or plywood sheets with 2 x 4s) around the areas to be protected. Be sure to include the outer edge of the tree canopy — the drip line. To avoid soil compaction, don’t allow equipment or materials to be stored within the fenced area. Once soil compaction occurs, there is little you can do to remedy this problem.
Animals and Equipment: To protect against damage caused by animals or equipment, install loose-fitting guards to protect tree trunks. Lawn mowers and weedeaters may cut your tree’s trunk. These guards should allow for adequate air circulation. Do not wrap trees, unless there is a serious threat of sunscalding. Thin-barked trees planted in spring or summer into hot or paved areas may benefit from wrapping if a white wrap is used. If wraps must be used, remove them within one year. Wrapping trunks increases the risk of insect, disease, and water damage.
Return to Index at top of page
GROUNDCOVERS, PERENNIALS, VINES, & ORNAMENTAL GRASSES
These plants add color and interest to your property and may reduce maintenance once established. They can carpet your land, highlight and feature its assets, and screen its unattractive spots. Hundreds of varieties with varying colors, textures, and growth habits are available.
Groundcovers are useful to reduce the area that requires mowing and weeding and to protect slopes from erosion. For the best effect, groundcovers should be perennial, low maintenance, long lasting, attractive, and interesting year-round. Avoid invasive plants; what is fast and delightful the first year will be a real maintenance nightmare the fifth year.
Perennials are plants that return year after year. The foliage frequently dies back every fall and reappears in the spring. Planted in masses, they provide color and interest to a border or a garden. They require more maintenance than annuals to keep them thriving year-round. They need to be weeded and mulched and should be divided every two to three years.
Annuals are plants that flower and live for one season. They require little care and can be grown from seed or purchased as plants. View them as a collection of paint pots to be used to color your garden or deck. And if you don’t like the result, you can start fresh next year.
Vines are annuals, perennials, or groundcovers that climb. They are valued as screens, as canopies on trellises, and as features in a garden.
Ornamental grasses have become popular landscape plants. Requiring low maintenance and ranging in size from a small pincushion to tall and columnar, they provide a sturdy and steady ornamental planting. Meadow plantings are another popular landscaping technique. These are a mixture of prairie and meadow grasses and wildflower seeds. Although advertised as easy and fast, a lush meadow will take some effort to establish.
PLANTING
Spring planting is recommended for most groundcovers and other herbaceous plants. If planted in the summer, water frequently.
Selecting Plants: Many of these plants require a mixture of direct sunlight and shade. Knowing the amount of sunlight and shade available is essential before you plant. Be sure to identify the mature size, growth habit, and water requirements before planting a large number of plants. (These features are often listed on the plant’s tag at the nursery.)
Spacing: Each plant will grow at a different rate, some slower and others faster. The list on this page estimates the number of plants needed to cover an area with a specific spacing.
Preparation: Competition is keen for soil nutrients and water. Soils must be well-drained yet retain enough water and nutrients to provide for healthy growth. Add organic matter such as peat, compost, or manure as 1/3 of the total soil mix. To achieve this, add 2 inches of organic matter and till to a depth of 6 inches. If tilling is not possible because of the slope or size of the area, provide a pocket of well-mixed soil around each plant to give it a strong start.
MAINTAINING
The most important aspect of establishing and maintaining groundcovers and other herbaceous plants is to control weeds right after planting. Weeds will squeeze out new plants before they have a chance to grow.
Mulching: A 2 to 3 inch-deep mulch around new plantings is a good defense against weeds. Mulches not completely decomposed, such as wood shavings, will draw nitrogen from the soil. To avoid damaging the plant, add more nitrogen to the plantings.
Fertilizing: Unless otherwise recommended by soil test results, work a slow release 5-10-10 or 10-10-10 fertilizer into the soil before planting. Be sure to follow application rates on the packaging. Over-fertilizing will encourage weeds, pollute runoff, and burn the roots of your new plants.
Return to Index at top of page
LAWNS
Producing quality lawns in Virginia can be a challenge, yet almost everyone tries. Many alternatives to a lawn are available today — a natural meadow, a butterfly garden, a grove of trees with an understory of rhododendrons, a flowering groundcover, or a stone terrace. However, sometimes only a lawn will do — for baseball games, for croquet, for a putting green, or for a baby crawling. So if you must plant and nurture a lawn, here is some advice.
Geographically, Virginia is located in what is known as the transition zone for turfgrasses. This means the climate can be hostile to both cool-season grasses (Kentucky bluegrass, turf-type tall fescue) and warm-season grasses (bermudagrass, zoysiagrass). However, with proper cultural practices and some work, a healthy lawn can be established and maintained.
Grass may be established from seed, sprigs, plugs, or sod. The method depends on the grass species desired, the environmental conditions, time constraints, and financial considerations. Be sure to use only certified seed and sod so you end up with what you intended. The same requirements for soil preparation apply for all methods.
ESTABLISHING YOUR NEW LAWN
Soil Test: Always begin with a soil test. This will determine which nutrients are available in the soil and will provide liming and fertilization recommendations.
Soil Preparation: If you are grading a new lawn area, save the topsoil by moving it and stockpiling it for later use. The ground should slope away from buildings. Before replacing the topsoil and planting, let the area settle during two or three heavy rains. Fill low spots in the yard where water collects with additional soil. Remove debris, large rocks, and rotting wood from the site.
Once the ground has settled, spread your stockpiled topsoil and any additional organic matter evenly over the entire lawn area 6 to 8 inches deep. If you don’t have enough topsoil, mix what is available with organic material into the upper inches of the subsoil by tilling. Work the lime and fertilizer into the top 4 to 6 inches of soil.
Lime: Turfgrasses do not perform well in acidic soil, and most soils in Virginia are acidic and below pH 6.2, the ideal pH for lawns. The presence of moss is an indication of an acidic soil. The amount of lime recommended to raise the soil pH to 6.2 will be based on your soil test. The lime should be tilled into the soil to a depth of 4 to 6 inches. If a soil test indicates low available magnesium levels, use dolomitic limestone.
Fertilizer: When applying the fertilizer recommended in the soil test, till in 2/3 of the amount to a depth of 4 to 6 inches. The remaining 1/3 should be applied to the surface just prior to seeding, then lightly raked into the soil.
Weed Control: Any perennial broadleaf or grassy weeds should be eliminated prior to planting by properly applying a herbicide. Dispose of remaining herbicides properly and clean up thoroughly.
When Should You Plant? You’ll have the most success with grass seeding if you do it at certain times of the year when the temperature, moisture, and day length are most favorable for establishing cool-season or warm-season grasses. Cool-season turfgrasses are best seeded in late summer; early spring seedings are prone to damage from crabgrass invasions and summer drought. Warm-season turfgrasses are best established from May to July. Sod can be installed during most of the year, except when the turf or the ground is frozen. Delay installation during the really hot and dry periods of the summer. If sodding must be done under these conditions, keep the turf moist and use water to cool the soil. Thoroughly water the sod as it is laid.
SELECTING THE BEST METHOD
Seed vs. Sod: A quality lawn containing the recommended mixtures and species can be established with either seed or sod. Successful, weed-free establishment is more difficult with seed than with sod. Also, because of the time required for germination and root growth of seed, the area is exposed to erosion. Sodding practically eliminates such problems, an especially important factor on steep slopes.
Seeding and Mulching: Start by preparing a smooth, firm seedbed. Rake the seedbed to create shallow, uniform depressions (rows) about 1/4 inch deep and 1 to 2 inches apart. Divide your seed in half; sow the first half of the seed in one direction (north/south); sow the remaining seed in the opposite direction (east/west). Cover the seed by raking lightly. Mulch the area with straw or other suitable material so that approximately 50 to 75 percent of the soil surface is covered. This is normally accomplished by spreading one and one-half to two bales of high-quality, weed-free straw per 1,000 square feet. The light mulch does not need to be removed after the grass begins to grow.
Sodding: You also need a smooth, firm surface for sod. If your planting day is hot, moisten the soil to cool it before laying sod. Premium quality, certified sod is easier to transport and install than inferior grades. Good sod is light, does not tear easily, and quickly puts a root system into prepared, well-watered soil. Install sod on top of freshly tilled soil as soon as you get it; it is perishable and should not remain in a stack longer than 36 hours. Be sure that the sod you buy was cut the day before, not days or weeks ago.
MAINTAINING A LAWN
Lawn maintenance can be simplified if you adhere to several recommendations in this guide.
Mowing: Mow your lawn at a height of 2 1/2 to 3 1/2 inches. Longer blades of grass provide for a more vigorous lawn with a thicker turf and fewer pests. Adjust your mower so you do not remove more than 1/3 of the grass blade at any one mowing.
Mulching: Leave short grass clippings to decompose on the lawn, replenishing needed nitrogen. If you don’t have a mulching mower, compost excessive grass clippings. Midsummer thatching will help control insects and fungus disease harbored in lawn clippings.
Watering: Watering is seldom necessary to keep established turf alive; however, approximately 1 inch of water per week during the growing season is necessary to keep it attractive and may prevent it from going dormant. Delay supplemental watering until the grass begins to indicate a need. Water thoroughly, wetting the soil to a depth of 4 to 6 inches. The next watering should be delayed until the ground is dry and the grass again shows a need. The best rule is to water only when the lawn begins to wilt from dryness –– when the color dulls and footprints stay compressed for more than a few seconds. Most lawns are watered too frequently with not enough water at each watering.
Aerating: Aerate the lawn once a year in late summer to early fall and to a depth of 2 to 3 inches using a core aeration machine. By removing plugs of soil, core aeration stimulates root growth and increases soil porosity. Together these improvements reduce runoff, increase nitrogen absorption, and reduce the need for herbicides. Stimulating root growth keeps the plants healthy and creates a thick lawn. The first few times you aerate, be sure the soil is well saturated to allow the spoons or tines to penetrate their full depth. After several years of regular aeration, the soil can be aerated even when it is dry. Some summers a well-aerated lawn may require no additional water. It will also become too dense for weeds.
Liming: Apply ground agricultural limestone as needed to maintain the pH of the soil between 6 and 6.5. After you have corrected a pH problem, you may need supplemental applications approximately every three years. To be sure, test your soil every three years, and follow the recommendations.
Nutrients: The kind of grass you have determines the best time for you to add needed nutrients, especially nitrogen. For the cool-season grasses, such as bluegrass, fescue, and ryegrass, apply the major portion of the year’s nitrogen in late summer and fall. Warm-season grasses, such as zoysia and bermudagrass, should be fertilized in late spring or early summer. Avoid early spring fertilizing for either type of turf. Phosphate and potash must be maintained at adequate levels for satisfactory turf growth. Lawns and similar turf areas in Virginia generally need from 3 to 5 pounds of nitrogen per 1,000 square feet each year, depending on the soils, species, and other conditions. A little experience will enable you to determine the fertility program that best suits your conditions.
Fertilizer Programs: Supplying the needed nutrients is essential to maintaining a healthy lawn. Over-fertilizing and exceeding the application rates may promote excessive top growth and a shallow root system and are major sources of water pollution. Be sure to keep the fertilizer off your sidewalks and driveways as it can easily wash into a local stream or drainageway.
Return to Index at top of page
COMPOSTING
Yard and kitchen waste create a valuable and free source of fertilizer. Composting these materials is a great way to reduce your need for inorganic fertilizers and to improve the physical properties of your soil. The leaves you rake, the grass you mow, and the branches you trim are some of the ingredients you can use to make compost. Finished compost is dark and has a pleasant smell. It is produced when organic matter, such as garden, lawn, and kitchen waste, is broken down by bacteria and fungi.
Use compost throughout your landscape — till it into gardens and flower beds, add it to the soil when renovating your lawn, or sieve it and use it in potting soil.
BENEFITS OF COMPOSTING
Compost improves the soil and serves as food for microorganisms. Heavy soils are generally compacted and have inadequate air space available for good plant root growth. Water does not infiltrate a compacted soil; it runs off and causes erosion. Compost materials can make a heavy soil more loose and porous. Compost can also be used as a base mulch with other mulches, such as bark, added for aesthetic quality. It can be applied to the soil surface around plants as a mulch or worked into the soil when preparing rose, annual, perennial, or bulb beds and vegetable gardens. It can be used for lawn establishment. Compost stimulates microorganisms and provides a home for many beneficial insects, earthworms, and other soil organisms.
CONSTRUCTING A COMPOST BIN

A compost bin can be as plain or fancy as you want. You can choose from numerous commercial composters or construct your own from old pallets, concrete blocks, planks, or wire mesh. A bin is not needed but is helpful if you intend to make compost regularly.
Location: Place your compost bin on a well-drained site. If well-maintained, the pile should not create offensive odors. If constant maintenance is not possible, place the bin away from areas where it may disturb your neighbors.
Construction: Bins should be constructed in a size ranging from 3 feet deep, wide, and long to 5 feet deep, wide, and long. If it is any larger, you won’t retain sufficient heat throughout the pile. If smaller, it will be difficult to maintain enough aeration to keep it from stinking. You may prefer to set up a series of bins, one for fresh refuse, one for an active composting pile, and one for storing the finished compost.
Making Compost: Compost is easy to make. Just follow the recipe. Like making chicken soup, once you get the principles down, you can adjust the recipe based on the ingredients on hand.
- Put down a layer of coarse plant material 3 to 6 inches thick, such as small twigs, chopped corn stalks, or a wooden pallet.
- Next, add 8 to 10 inches of dry organic wastes (leaves or vegetable materials).
- Provide nitrogen for compost-promoting microorganisms by adding 2 to 3 inches of fresh grass clippings or fresh manure. If fresh nitrogen sources are unavailable, add about 1/3 cup synthetic fertilizer (36-0-0) per 25 square feet of surface area.
- If your materials are clean, add soil between each layer to introduce microorganisms into the pile.
- Moisten the pile as you add leaves and other dry material.
- Mix the pile together and shape it so the center is lower than the sides to help water flow into the pile. Keep the pile moist, but not soaking wet. Within a few days the pile should heat up as the decomposition process begins. If the pile begins to emit an odor, it is not getting enough air into its center. Add coarse material and stir the pile with a pitchfork.
How Long Do You Need to Wait? In warm weather you should have compost in five months. It will take a bit longer if the weather is cool or dry.
Maintaining and Using Compost: Once a month, turn your compost pile. Use a pitchfork and mix the pile, adding new material as it is available. To kill weed seeds, pests, eggs, and diseases, the pile should reach a temperature of 160 degrees Fahrenheit.
Compost can be used in potting mixtures and gardens, for new lawns, and around landscape plantings. Spread 2 inches of compost on your garden every year and till it to a depth of 4 to 6 inches. If you do not have enough compost for the entire garden, use what you have when you transplant seedlings. Raised gardens with intensively grown plantings can greatly benefit from nutrient-rich compost. Don’t use compost on established lawns. It may cause the thatch to build up or be a source of disease.
Return to Index at top of page
VEGETABLE GARDENS
Your home garden is an excellent source of fresh vegetables, including exotic and gourmet varieties unavailable at the local supermarket. It is a place to teach your children about the earth and growing things, and a place to relax and revel in the sheer pleasure of watching delicious things grow.
PREPARING SOIL
A fertile, well-drained loam is best for your vegetable garden. Improve infertile, sandy soils or heavy clay by adding organic mulches, household compost, and plant residues. Manure may be used to supply nutrients and organic matter, but it usually is expensive and difficult to obtain and may contain many weed seeds. Dig in organic matter to let it compost with your soil. Before seeding, work the surface to develop a fine crumb texture ideal for planting and germination.
Have your home garden soil tested every three years. Most vegetables grow best under slightly acid conditions, with a pH of 6.3 to 6.5. If your soil is strongly acid with a pH of 5.5 or lower, add ground limestone to make it more alkaline. If the soil analysis indicates that magnesium is low, apply dolomitic lime. Have another soil test conducted in six months to determine the effectiveness of your liming program.
PLANTING YOUR GARDEN
Vegetable gardens can grow anywhere there is a sunny spot. The easiest site to prepare is a well-drained flat site, but sloping sites can be modified with terraced walls, and a wet site can be modified with raised beds. Tucked into flower gardens, vegetables may prove to be the most intriguing and attractive plants. They can be grown in small areas and containers on your deck or patio. Herbs can also be grown in pots near windows year-round.
Purchasing and Storing Seeds: For best results, purchase seeds from a reliable seed source. These seeds are grown under controlled conditions and will produce large yields of high-quality vegetables, true to their label. Many vegetables cross-pollinate rather readily, so if seeds are saved from the home garden, the next crop may be less productive and of poor quality. Also, many of the newer and best varieties are hybrids, which revert back to less desirable forms if the seed is saved.
Certain plants are better suited if you want to save seeds from your garden. Except for hybrid varieties, you will have good results with seeds saved from beans, peas, and okra, and a bit less reliability with seeds from eggplant, pepper, and tomato because these vegetables are generally self-pollinated. Seeds may also be saved from standard varieties of cucumber, cantaloupe, pumpkin, squash, and watermelon if only one variety of each is grown in the garden.
Although vegetable seeds gradually lose their viability, most types may be kept for several years and will still germinate and produce satisfactory crops. Saving extra seeds in an airtight tin, glass, or plastic container in the refrigerator or deep freeze will save you money. Seeds are likely to deteriorate quite rapidly if held under warm, humid conditions.
Arranging Crops and Rows: Plant perennials such as asparagus and rhubarb along one side of your garden so they will not interfere with soil preparation for annual crops. Plant early season and quick-maturing crops together to facilitate the sowing of late summer and fall crops. The rows in the garden should run across the slope to reduce the possibility of erosion. There seems to be no significant benefit in terms of exposure to the sun from running the rows in a north and south direction as is sometimes suggested.
Determining Planting Distances and Depths: The rows in the garden should be spaced as close together as possible to get the highest yields, and yet far enough apart to allow space for the plants to grow and room for you to walk. If you use power equipment, make sure to leave enough room for it to pass between your rows. Onions, leeks, and root crops like carrots may be planted in double rows or in beds several rows wide to secure higher yields.
Many gardeners plant seeds too deep. Determine the appropriate depth by the seed’s size and the soil’s ability to hold moisture. Seeds need to be moist to germinate, so plant deeper in sandy soils and in any soil type during the drier summer months. In good, loamy soil, most vegetable seeds should be covered to a depth of about five times their largest diameter. Firm the soil along the row after you plant. If the soil is clayey, plant the seeds shallower and cover with sand or vermiculite to conserve moisture.
Crops of certain vegetables may be harvested 30 to 40 days earlier if seedlings are planted rather than seeds. Start these vegetables inside your home or purchase seedlings at planting time.
Start these vegetables early inside and plant later outdoors as seedlings.Six weeks ahead of time:
- Cauliflower
- Broccoli
- Cucumber
- Lettuce
- Tomato
- Pepper
- Eggplant
- Celery
Seeding and Thinning Seedlings: To ensure a full stand of plants and a bountiful yield of vegetables, sow one and one-half to two times more seeds than needed. When the seedlings are several inches tall, thin them to the recommended spacing. Don’t hesitate to thin your rows. Crowded plants are more susceptible to diseases and will not produce as large a crop of high-quality vegetables.
Vegetable Seedlings: Crops of certain vegetables may be harvested 30-40 days earlier if seedlings are planted rather than seeds. Start these vegetables inside your home or purchase seedlings at planting time. 6 weeks ahead of time: cauliflower, broccoli, cucumber, lettuce, tomato. 8 weeks ahead of time: pepper, eggplant. 10 weeks ahead of time: celery. Start these vegetables early inside and plant later outdoors as seedlings. Too much of a headstart will not pay off; plants started too early may become too large and leggy for easy transplanting.
Fine seeded crops that produce relatively small plants like beet, leek, carrot, kohlrabi, radish, swiss chard, and turnip may be scattered thinly in a band about 4 inches wide. The young seedlings may be thinned to a double row or band of scattered plants to secure optimum yields. Large seeds like beans and corn may be dropped about one and one-half times as close together as the suggested distance between plants and thinned later to the desired spacing.
Secure an early crop of broccoli, cabbage, cucumber, eggplant, cantaloupe, pepper, and tomato by setting young seedlings in the garden rather than planting seeds. For the late summer and fall crop of these vegetables, plant several seeds per spot at the desired spacing of 15 to 18 inches apart, and thin later to one plant at each location. Follow the same method for pumpkin and squash with a 24 to 30 inch space between plants. Scatter extra seeds in the row and transplant the resulting seedlings to other locations in the garden after early crops have been harvested or where seeds fail to germinate.
Transplanting Seedling Vegetable Plants: Select sturdy seedling vegetable plants with dark green color. Avoid tall, spindly, light green, or yellow plants. Set seedling plants about 1 inch lower than they grew in the flat or peat pot. If you plant the seedlings in their peat pots, be sure to keep them moist, and remove any portion of the pot above the garden surface. When peat pots have been allowed to become dry and hard, root growth through them will be slowed. Place tomato plants in a deeper hole or trench and cover with 3 inches of soil, leaving the plant’s top 5 or 6 inches exposed. Tomato plants will sprout roots along the buried part of the stem.
Promote rapid growth of your seedlings with additional nutrients. Pour 1 cup of water mixed with a soluble fertilizer around each plant when it is initially planted. Repeat this every day for about four days.
Extending Your Harvest: As early crops are harvested, continue to make new plantings to provide fresh vegetables during the late summer and fall.
Make furrows for planting seeds in the fall garden without plowing or rototilling if the soil is fertile and easily worked. Cover the seeds about twice as deep as you did in the spring and keep the soil moist. To ensure germination of seeds, apply a gentle spray of water along the row after the seeds are planted. Repeat daily to maintain the soil moisture until the young plants are well established and making rapid growth.
MAINTAINING YOUR GARDEN
Keeping your garden free of weeds and pests is a job that is made much easier if you work frequently in your garden.
Weed Control: Weeds must be controlled so they don’t compete with your vegetables for food and water. Cultivate or hand weed your garden as frequently as needed to destroy all weeds when they are small. Don’t dig too deep and damage the shallow roots of your vegetable crops.
Herbicides are not a practical method for controlling weeds in your home garden. Plants are close together, and the risk that the herbicide will kill your vegetables in addition to the weeds is too great.
Mulch: An organic mulch will conserve soil moisture, help to control weeds, and improve the soil. Leaf mulch is suited to larger crops and vines and may be applied when the plants are 8 to 12 inches tall. Beware of using sawdust or lawn clippings on your garden. The biologic process that breaks them down consumes large amounts of nitrogen and may cause a sudden nitrogen shortage. Sawdust or lawn clippings from the inside of a pile also may go through anaerobic decomposition and become very acid, with a pH of about 3 and a pungent odor. Such material is very toxic to plants.
Black plastic, kraft paper, or newspapers may be used as a mulch to reduce the loss of soil moisture by evaporation. These mulches prevent weed growth, especially grass-type weeds, which spread by rhizomes. Crops may be planted in rows between strips of mulch, or plants like cabbage, cucumber, or tomato may be set in holes punched through the plastic or paper. Be sure to spread and work into the soil an adequate amount of fertilizer before applying the plastic or paper. Vine crops, such as cantaloupe and summer squash, grow especially well with this type of mulch.
Weeds that grow up through the mulch should be pulled when they are about 2 inches tall, when the soil is moist after a rain or irrigation. Do not cultivate or hoe a mulched garden as this would destroy the effectiveness of the mulch and bring weed seeds near the surface where they will germinate.
Remove plant residue from your garden after harvesting if you intend to use the garden again. Plant material can harbor insects and diseases.
Fertilizing: Most vegetables require ample amounts of fertilizer to promote vigorous growth. A soil test is a good way to determine the fertility of your soil and get recommendations for its improvement. If no special recommendations are given, spread 4 pounds of 5-10-15 or 5-10-10 per 100 feet of row, and till into the soil. On poor soils, make an additional application of 1 pound of 10-10-10 per 100 feet of row. Place the extra application in the furrow at the time the seeds are planted. Mix the fertilizer with the soil and cover with about 2 inches of soil before sowing the seeds to avoid burning the seedling roots when germination occurs. Slow-release fertilizers are recommended for use during most of the growing season, except early in the growing season when quick-release fertilizers will make nutrients immediately available to growing plants.
A small amount of additional fertilizer containing nitrogen applied between the rows about a month after growth starts will be beneficial for most vegetables. This is particularly true for corn and leafy vegetables such as broccoli, kale, cabbage, celery, lettuce, and spinach. Scatter 1 pound of 10-10-10 or 2 pounds of 5-10-5 fertilizer per 100 feet of row, and scratch into the top inch of soil with a rake. Repeat the light application whenever the plants are not making satisfactory growth or do not have the desired green color.
Watering: Vegetables require about 1 inch of water each week from rain or irrigation to promote maximum growth and yields. If weather conditions are hot and dry, a garden may need more water, and if conditions are cool and humid, water may not be needed at all. Conserve moisture by controlling weeds and using mulch. Don’t wait for signs of wilting to water; however, the soil should be moderately dry before water is applied.
Pests and Diseases: The best way to control pests and diseases is to prevent them. Observe your garden regularly and be aware of any changes. Select plant varieties that are resistant to common diseases and pests, and purchase disease- and insect-free seed from reputable growers. Be sure to plant properly, and thin seedlings to reduce overcrowding. Keep down the weeds, and remove refuse that might harbor pests and diseases. Avoid watering in the evening or walking through the garden when foliage is wet from dew, rain, or irrigation. Night watering may invite fungus growth on damp foliage and brushing against wet foliage may damage it. Refer to the chapter CONTROLLING PESTS for additional ways to control pests in your garden.
HARVESTING YOUR GARDEN
Harvest your vegetables as soon as they reach edible size or ripeness. Don’t waste them unless you hope to win the biggest zucchini prize at the local fair. Vegetables left too long in the garden don’t fare any better than those left in the back of the refrigerator.