

Check out this how-to guide for simple DIY bookbinding, and read our brief history of books to learn where the craft started.
All About Creativity
Makerspaces and projects are important for kids of all ages — and adults, too! A large and growing body of research, like that cited by Sylvia Martinez for Edutopia and by Sue McCleaf Nespeca for the Association for Library Service to Children, indicates that engaging with technology and materials to solve problems, play, tinker and explore is key to creative development. Some makers choose to employ technology in their projects while others prefer hands-on DIY activities, crafting and other tactile projects.
Making a simple book at home could not be easier, and it’s a great activity for school-age children. A handmade book could be used to keep a nature journal, a diary, a sketchbook, a first novel, a list of goals, or a conversation between parent and child where the book is passed back and forth.
 How to Make a Simple Pamphlet Stitch Book
Former FCPL librarian Brooke Stoneman shares her method for DIY bookbinding as a fun, creative activity and an easy introduction to the craft of bookbinding.
Materials:
- Paper: Gather several sheets of paper for the inside of the book and one for the cover. All papers should be the same size.
- String or yarn: The thicker the string the bigger the holes should be.
- Large needle: You will use this to punch small holes in the spine of your book and to sew the book.
Instructions:
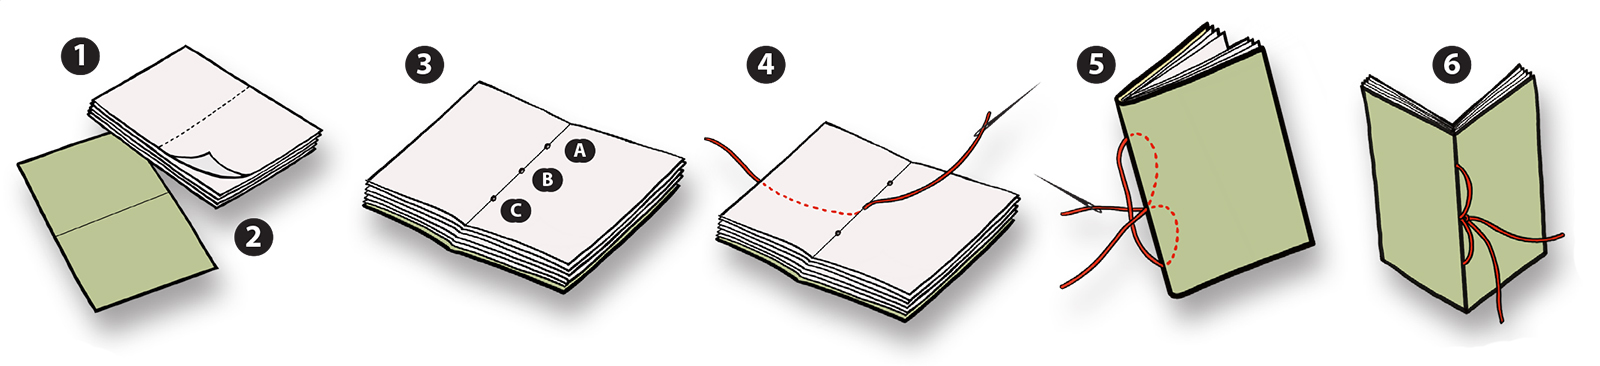
- Stack 3-6 papers (more or less depending on thickness).
- Place stack on top of the cover and fold all in half, making a crease.
- Unfold papers, punch three holes (A,B, C) equal distance apart through spine.
- Begin sewing by entering Hole B from the outside cover and ending up inside the book.
- Sew out through Hole C, back in through Hole A, then back out through Hole B.
- Both string ends should be on the outside, one on either side of the long stitch running down the spine. Use the string ends to tie a square knot over the long stitch.
Want More? Check Out Crafting How-Tos
Visit your library or search the catalog online to find more books on bookbinding and handicrafts you can explore at home. Here’s a list from Tysons-Pimmit Library’s youth services manager, Roxanne, to get you started!
More Kids’ Crafting Activities
- Easy Arts & Crafts for Kids: 50 Fun Projects to Make, Wear and Share by Jennifer Perkins
- Crafting Fun for Kids of All Ages: Pipe Cleaners, Paint & Pom-Poms Galore, Yarn & String & a Whole Lot More by Kim Uliana
- Made by Hand: A Crafts Sampler by Carole Lexa Schaefer
- Out of the Box by Jemma Westing
- 101 Kids Activities That Are the Bestest, Funnest Ever!: The Entertainment Solution For Parents, Relatives & Babysitters by Holly Homer