

The Northern Virginia Soil and Water Conservation District, which is a non-regulatory agency, can assist you in preparing and implementing your Soil and Water Quality Conservation Plan. Email the district to request assistance from our agricultural water quality specialist.
Water Quality
 Good quality water is vital to sustain life! By implementing good land and water management skills, suburban stable operators can reduce Non-Point Source (NPS) Pollution that adversely impacts the quality of water in our ponds, streams, lakes and rivers. Furthermore, these management skills save money and create a more aesthetically pleasing horse-keeping site.
Pollution that does not come from a specific point such as an industrial pipe or a sewage treatment plant is referred to as NPS pollution. NPS pollution is the result of sediment, nutrients, bacteria and organic debris that are washed into streams and rivers primarily by storm water and snowmelt runoff. Reducing NPS pollution is vital to protecting valuable natural resources such as those found in our neighborhoods and the Chesapeake Bay.
The use of Agricultural Best Management Practices (BMPs) is highly recommended for "backyard" and "small-lot" horse operations. These management techniques can provide improved pasture for grazing, prevent erosion and maintain good water quality.
Return to Index at top of page
Site Planning
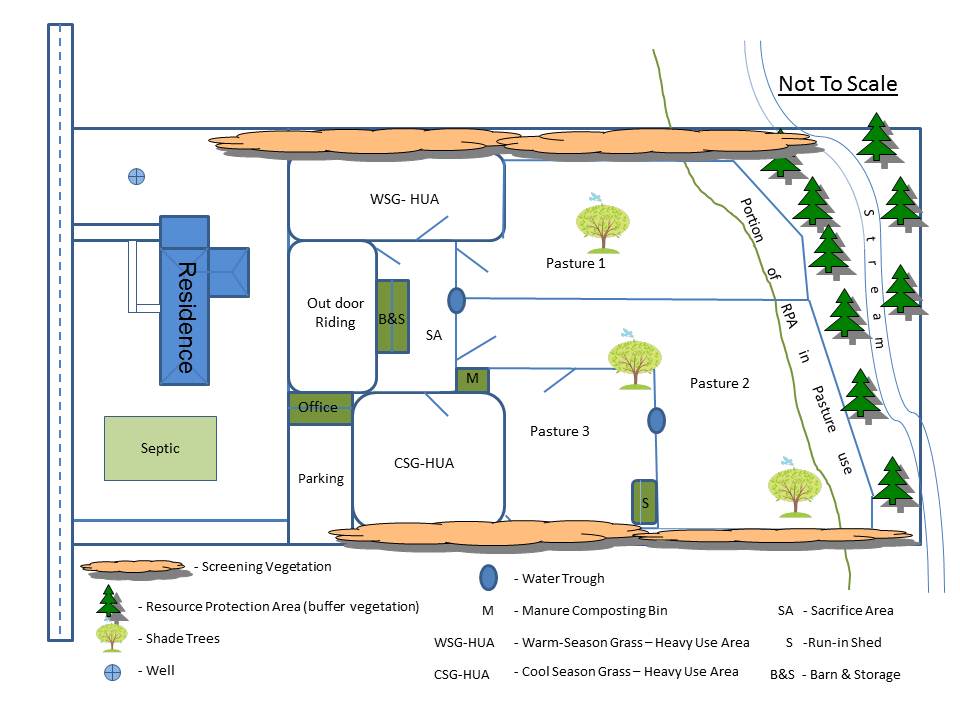
Figure 1: A well-planned horse-keeping facility
ILLUSTRATION NOT TO SCALE
A successful horse operation starts with good site planning [Figure 1]. A poorly planned site presents its manager with disease, pest and pollution problems. It is never too late to relocate horse operation features if there is a problem with the current setting.
Good planning tips to consider:
- Maintain as much vegetated area as possible between the general operation site and any permanent water body.
- Locate heavily used areas on high grounds that will be less impacted by runoff.
- Strategically position drinking troughs to serve multiple fields.
- Locate the heavy use or sacrifice areas close to the barn for easy access.
- Separate pastures with gated-fences to restrict animal movement and control grazing.
- Install diversions or downspout extenstions to direct runoff around critical areas.
- Locate manure storing or composting site at least 100 feet from a stream or well.
- Screen your operation from neighbors and the public for liability and horse safety reasons.
Return to Index at top of page
Pasture Management
| Available Pasture Size per Horse | Grazing Duration per Day |
|---|---|
| 0.5 acre | Less than 3 hours |
| 1.0 acre | 3 - 8 hours |
| 1.5 acres | 8 - 12 hours |
| More than 2 acres | Unlimited |
Table 1: Pasture Size and Grazing Times
Nutritionally, it is recommended that horses obtain 70-100 percent of their feed from pasture and/or hay. No doubt, a significant reduction in feeding cost will be realized if horses get the bulk of their feed through grazing. The exercise they get while moving around during grazing is essential for their digestion.
Horse farms with high density of animals per acre commonly have over-grazed pastures. The higher the stocking rate per acre, the shorter should be the grazing duration per field to prevent over-grazing. Table 1 provides guidelines for recommended grazing duration based on maintaining a 70 percent grass cover. These determinations are acccurate only if adequate pasture management practices are in place. These practices include appropriate fertilizing, annual over-seeding, adequate rest periods, weed control and an efficient rotational grazing system.
| Pasture Seed Mixes | Seed Types | Seeding Rates (lbs/acre) | Comments |
|---|---|---|---|
| A | Timothy | 3-5 | Orchardgrass yield increases by practicing rotational grazing |
| Orchardgrass | 3-5 | ||
| Kentucky bluegrass | 3-5 | ||
| White clover | 1-3 | ||
| B | Tall fescue** | 10-14 | Suitable for moderately to poorly drained soils as well as moderately droughty conditions. For continuous pasture, grazing should not be lower than three inches. ** Tall fescue infested with endophyte fungus should be kept out of farms with breeding horses. (See Table 3) |
| Ladino clover or White clover | 1-2 | ||
| Red clover | 3-4 | ||
| C | Ladino clover or White clover | 1-2 | Makes a high quality pasture. Needs well-drained soils and tolerates moderate drought conditions. Can be grazed down to 1.5” and allowed to recover to 5” – 6”. |
| Orchardgrass | 8-12 | ||
| Red clover | 3-4 |
Table 2: Horse Pasture Seed Mixes Using Cool-Season Grasses
If allowed, horses will graze about 75 percent of the daylight hours and 50 percent of the night time hours. They will selectively graze on all of their favorite growing vegetation until it is gone. The exposed soil will then become vulnerable to erosion. This causes pollution due to sediments and nutrients being washed into nearby water bodies.
Pastures with cool season grasses produce maximum vegetation during the spring and fall seasons. Minimal vegetative growth occurs during the summer and winter months. Therefore, grazing duration should be adjusted seasonally to comply with seasonal growth rates. A well-managed pasture undergoes minimal erosion and is able to provide horses and ponies with high quality, nutritious feed at a lower cost to the farm manager. See Table 2 for choices of pasture seed mixes and Table 3 for the advantages and disadvantages of the major grass component in the mixes.
| Grass species | Advantages | Disadvantages |
|---|---|---|
| Orchardgrass |
|
|
| Kentucky bluegrass |
|
|
| Tall fescue |
|
|
Table 3: Advantages and disadvantages of key grass species in the mixes
Tips for Good Pasture Management
1. Maintain adequate soil nutrient level and pH
Maintaining appropriate nutrient and pH levels in pasture areas are essential for optimum grass growth. It is only through soil tests that the required nutrient needs can be determined. Results obtained from the soil testing laboratory will contain recommendations regarding quantity of plant nutrients and agricultural lime needed to maximize grass yields. Under normal conditions cool season grasses grow best in soils with a pH range of 6.0 – 6.2. Recommendations from the laboratory should be followed, unless in cases where there is a more detail site-specific nutrient management plan prepared or approved by a Virginia State Certified Nutrient Management Planner.
Soil test kits and instructions for collecting soil samples can be obtained from your local soil and water conservation district office, your County Extension office or your local library. Perform soil tests at least once every three years. Soil samples can be collected at any time of the year. However, because of seasonal variations in the soil biological activities, it is best to collect your samples about the same time of the year.
An adequate amount of nitrogen (N) applied during the growing season promotes maximum vegetative growth, especially for cool season grass pastures. Applying the appropriate amount of phosphorous (P) and potassium (K), preferably in the fall, provides a strong, mature root system.
2. Establish a rotational grazing system
Most suburban horse-keeping sites have limited areas available for grazing. Simply dividing a pasture area into two parts is a significant start for controlling the grazing pattern of the horses. Having a system wherein the horses can be moved from one pasture area to the next is referred to as a “Rotational Grazing System” [Figure 2].
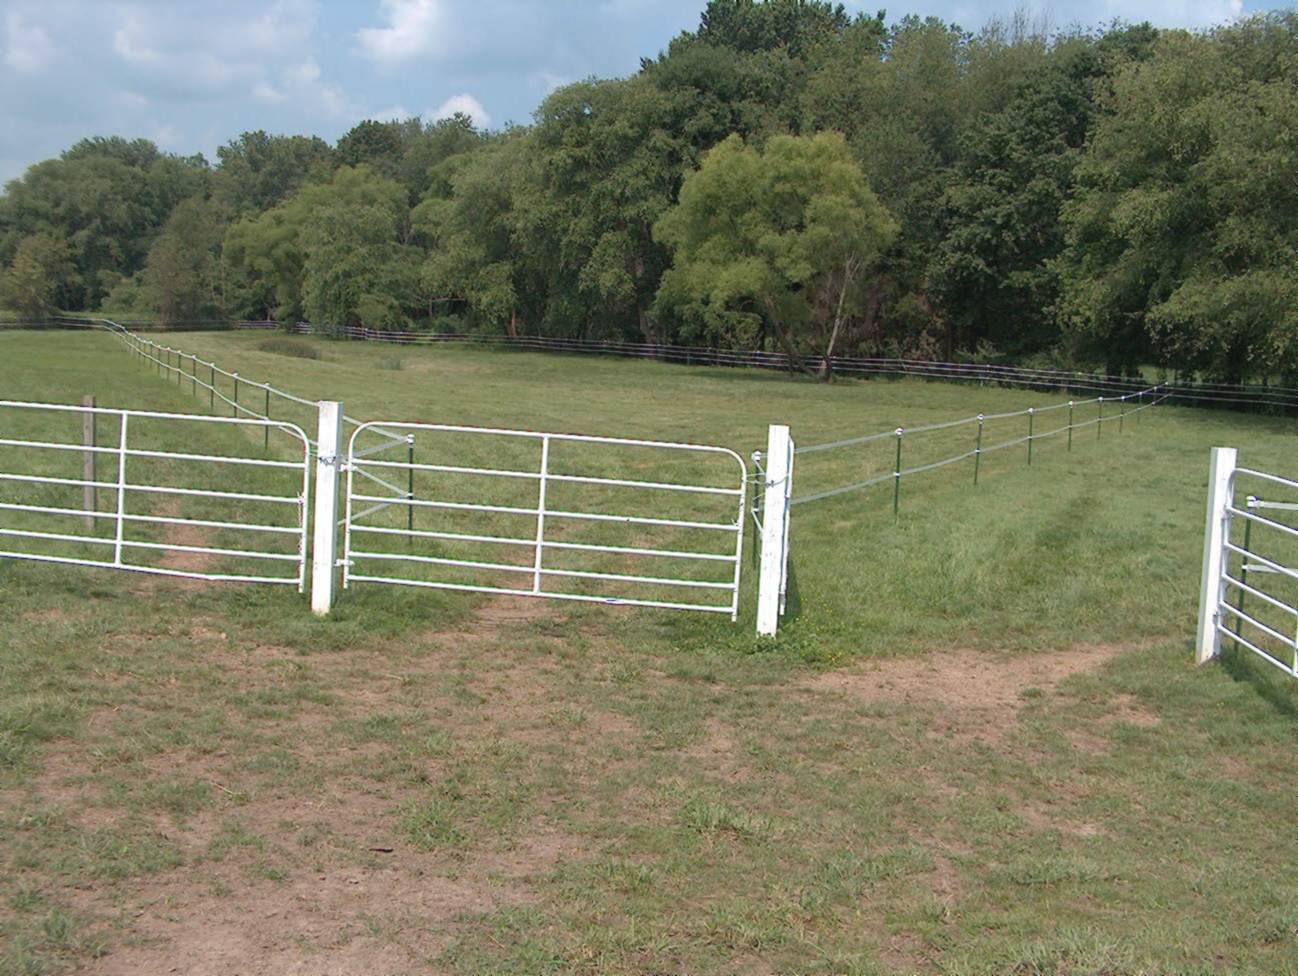
Figure 2: Rotational Grazing System
All fields are connected to heavy use area in foreground
Providing enough resting periods for pastures is absolutely essential to maintain healthy plant growth. Insufficient rest periods weaken and eventually kill the plants. Removing horses from pastures allows the grass to produce more leaf tissue and regenerate carbohydrate reserves in the roots. As a guideline, pastures consisting mainly of short grass species (such as bluegrass) should be allowed to rest when the pasture is grazed down to about 1 inch. For those containing mainly tall grass species (such as, orchardgrass or tall fescue) rest periods should come after the pasture height is just below 3 inches. Pastures with shorter grass species can be brought back into the rotational system after the plants have grown to heights of about 5-6 inches; fields with taller grass species will be ready for re-grazing after reaching about 7 inches. The duration of the rest period will be dictated by the time it takes for the grasses to reach their recommended heights.
An efficient rotational grazing system consists of multiple pasture fields and “grassed” and “non-grassed” heavy use areas. Ideally, aside from the regular pasture fields, there should be two grassed heavy use areas and one non-grassed heavy use area. One of the grassed heavy use areas should consist of warm season grasses only. This will provide grazing opportunity during the summer drought period when cool season grasses assume dormancy. The second grassed heavy use area should consist of cool season grasses. This will be reserved for periods when the regular fields need rest. The non-grassed heavy use area is otherwise known as a “sacrifice area.” This area is specially constructed using materials that enhance drainage. It is an area that provides opportunity for the horses to be taken out of the grassed fields during periods of drought or extremely wet conditions.
In situations where there is not enough space to have grassed and non-grassed heavy use areas, the grassed heavy use areas can be eliminated. No matter how small the area dedicated to a horse operation, having a non-grassed heavy use—or sacrifice—area is highly recommended in order to have a successful pasture management system.
When horses are moved to another field, the previous field should be “dragged” to break-up waste piles, and uneven vegetation should be mowed down for a more uniformly growing pasture. Horses should only be returned to the same field after the pasture height has regenerated and is back to about 6 inches or higher.
3. Control pasture weeds
Weed control is another important aspect of pasture management. A lush pasture of grass and clover (no more than 25 percent) is the best way to keep pasture weeds under control. If weeds are already established, mowing is a good management practice. Mowing hampers the growth of many weeds and prevents them from producing seeds.
In cases where weeds are persistent, the use of herbicides may be necessary. In such instances, the specific weed(s) of concern must be identified. Your local soil and water conservation district or County Extension office can provide assistance with weed identification, recommend appropriate herbicides and determine the most appropriate treatment time.
It is very important to follow all label directions and restrictions. Usually, the best time to chemically treat your weeds is when they are actively growing, external temperature is about 70°F and humidity is low.
Certain types of weeds are best treated at a specific time of their growth. For instance:
- Perennial weeds, such as buttercup, pokeweed or thistle, go dormant in the winter only to re-vegetate in spring. These plants are best controlled in late summer, although they can also be treated in spring.
- Summer annual weeds, such as pigweed, live for one year. They bloom in the summer and drop their seeds in fall in preparation for spring germination. Therefore, the best time to control them is in late spring when the weeds are actively growing and have not yet produced seeds. There is no reason to use herbicides on summer annual weeds in late summer or fall because they will die soon after the first hard frost.
- Winter annual weeds, such as chickweed, mustard and pepperweed, also live for a year, but their seeds germinate during late summer to early fall. The plants will persist through the winter, flower and drop their seeds in early spring. By late spring to early summer, they are no longer weeds of concern. Winter annuals can be controlled in late summer or early spring.
4. Renovate pasture fields
 Pasture renovation may require complete overhaul of the fields, re-vegetation of damaged or eroded areas, thickening of pasture vegetation and introduction of other pasture plant species to an existing pasture.
The most common way to renovate pasture is by overseeding. The best time to over-seed cool season grass pastures is late summer to early fall, i.e., late August through early September. Using a no-till drill to overseed yields better results than simply broadcasting. Broadcasted seeds do not make good soil-seed contact, which is essential for a high germination rate.
If the traditional broadcast method is the only available option, consider mowing down the existing pasture, then loosening the soil surface using a disk or a harrow, before broadcasting the seeds. You can use the harrow to drag the soil again over the seeds. Use a roller to compact the soil enough to improve the soil-seed contact.
Frost seeding is a technique that allows desirable species to be introduced into a pasture. This involves broadcasting the seeds of choice in late winter when the ground becomes frozen at night and thaws during the day. The freezing and thawing create “honey-comb” openings in the soil surface, and the seeds are pulled into the soil and germinate when the soil warms. Frost seeding is a proven technique for introducing clover into existing pastures. Grass species that have demonstrated high success rates using the frost seeding method are perennial rye grass and orchard grass.
5. Mow pasture fields
Mowing is an important practice in pasture management. It is also very important for maintaining a grass stand that is uniform in maturity and for subduing weeds. Shorter grass species, such as bluegrass and rye grass, should be mowed 2-3 inches; taller grass species should be mowed 4-5 inches.
Return to Index at top of page
Non-Vegetated Heavy Use Areas
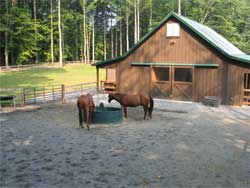
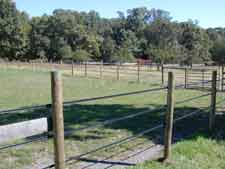
Figure 3: Non-Vegetated Heavy Use Area
A non-vegetated heavy use area is sometimes referred to as a turn-out or sacrifice area [Figure 3]. For horse operations established on relatively small acreages, HUA is a must-have feature for its rotational grazing system to be successful. Primarily, this feature provides outdoor exercise opportunities for horses when pastures are too wet, in recovery mode, going through a drought spell or under renovation. A heavy use area should be relatively flat and positioned such that there will be minimal offsite runoff flowing through it. Offsite water flowing through an HUA will cause “wash-off” of the surface material. In cases where off-site runoff may potentially flow through this area, diversion devices should be installed. When necessary, multiple heavy use areas are recommended so that horses can be kept in compatible groups or individuals that must be isolated will have their own HUA.
Locating and sizing heavy use areas: HUAs should not be situated within the Fairfax County Chesapeake Bay Resource Protection Area (RPA - see page 12 for explanation of RPA) or on a septic field. The slope on which it is constructed should be less than 5 percent. HUAs are best located on east or south facing areas where drying out will be fastest. Runoff from this area should not flow directly into a water body. If it appears as though this will be the case, a vegetated buffer (at least 25 feet wide) should be established between the HUA and the edge of the water body. It should be situated such that it is easily accessible to and from a shelter (such as the barn or a run-in shed), water source and feeding opportunity.
Sizing a heavy use area depends on available space, number of animals and the age of the animals. It can be sized as small as 14’ x 24’ for just one horse. The basic rule of thumb is that a full grown horse should be able to make convenient turns within the HUA/sacrifice area. If the area is being sized for multiple horses, it should be wide enough to allow a horse to make an easy getaway if it is about to be cornered by a dominant mate. The size of the HUA should be limited to just what is actually needed. Essential facts to remember are that the smaller the area, the lower will be the cost for materials and labor and the less time will be required to maintain it. HUAs must be cleaned at least two times a day, especially before a rain or snow event.
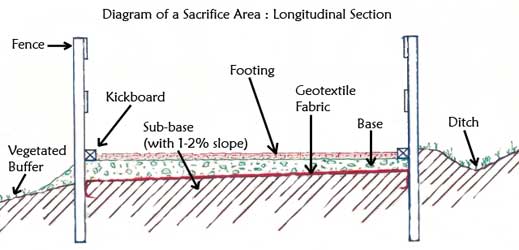
Figure 4: Diagram of a Sacrifice Area: Longitudinal Section
ILLUSTRATION NOT TO SCALE
Construction standards: Heavy use areas are constructed so they are well drained and will not hold puddles. They should be constructed with a VDOT #1 stone-base layer resting on a geotextile fabric to keep the stone layer from sinking into the native soil [Figure 4].
The upper most layer is referred to as the “footing” layer. This can be made from different types of material. Each has its advantages and disadvantages. Consider a footing material made of:
- Sand - This is easy on the hooves of the horses but can wash away quite easily. It can be dusty in summer months and can cause colic if ingested by horses during feeding. To address some of these setbacks, consider using “washed” arena sand and feeding hay to the horses from a hay rack.
- Crushed rock - The ideal particle size range is ½ - 5/8 inch. An order of “5/8 minus” crush ed rock will contain gravel 5/8 inch and smaller. This may be a little harsh on the hooves of the horses. It “locks” well but restricts drainage. Crushed rock that is “5/8 washed” contains only gravel 5/8 of an inch in size. This does not “lock” as well but drains well.
- Road/stone dust - This material consists of finer and varying particle sizes. It is easier on the hooves of the horses but has the potential to “pack” tightly and totally blocks drainage, especially on heavy traffic areas such as along fences.
A kick-board [Figure 4] is essential to keep the footing material from getting out of the holding area.
Water control measures such as a ditch and roof down-spout extensions may be needed to divert runoff away from the area. A vegetated buffer on the down-slope side may be needed to filter out some pollution in runoff from the HUA before it enters any nearby water body. Gated-access to various fields from the heavy use area makes for a “chore-efficient” operating system [Figure 1]
Maintenance: Animal waste and uneaten hay must be removed daily, especially before a rain or snow event, so that they don‘t accumulate and clog up the drainage system. Due to the high water retention potential of organic materials, horse waste and unused hay can also create serious “mud” problems. It is known that fine organic material can hold 200 - 300 times its weight in moisture! Residual organic matter should be scraped off before winter sets in. During the dry season, dust control measures must be implemented by sprinkling water on the surface. This also prevents accumulation of urine salts on the surface. Replacing or adding more footing material may be necessary every two to three years.
Return to Index at top of page
Animal Waste Management
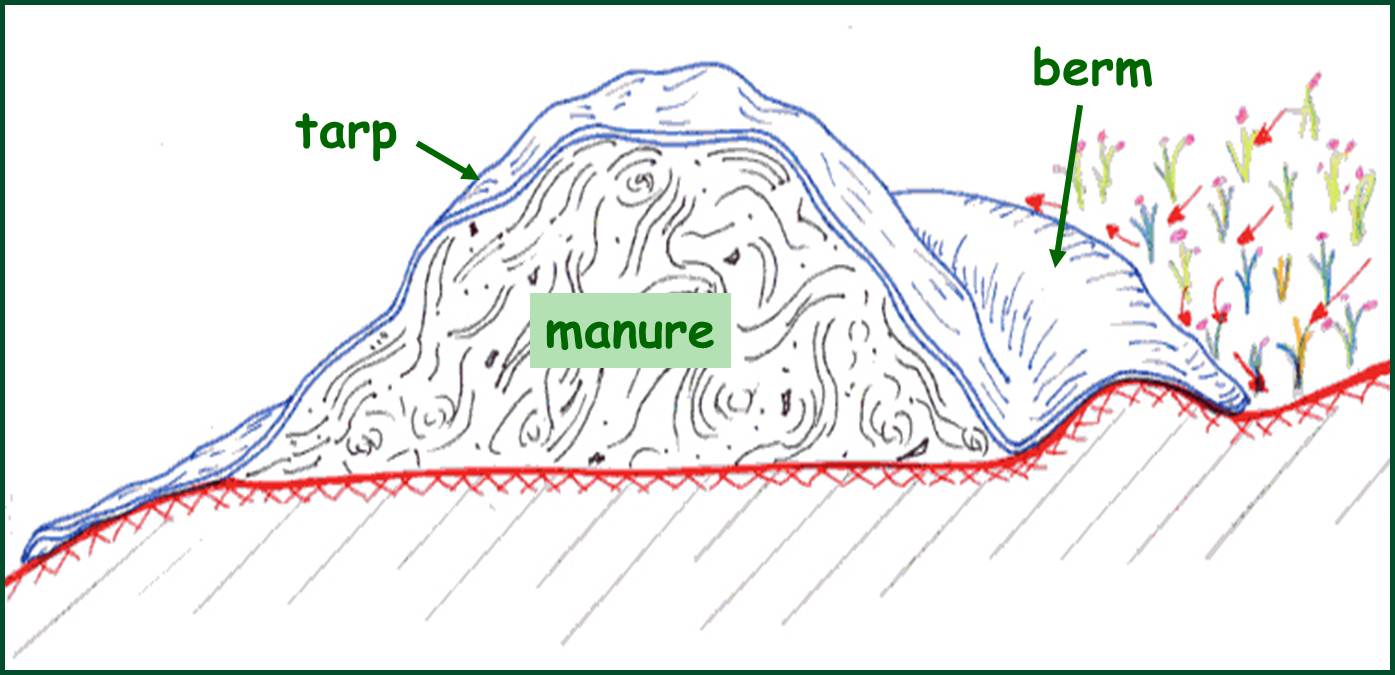
Figure 5: Illustration of a compost pile
Manure management is one of the most challenging problems that small horse farm managers face! A fully grown horse (approximately 1,000 pounds) produces 40 – 50 pounds of feces and urine daily—approximately nine tons of waste per year! Without a good waste management practice, waste grows out of control and becomes a source of pollution that washes off the land into nearby water bodies. Plant nutrients (nitrogen and phosphorus), bacteria and pathogens in the waste adversely affect water quality.
There are two practical ways of managing waste from a horse operation. It can either be shipped offsite to a location where it is disposed of or used in an environmentally safe manner, or it can be spread on established pastures onsite. In certain situations a combination of both options works best. Offsite disposal includes either donating it to a farmer or a gardener or contracting with a manure removal company for routine pick-up.
Managing manure onsite and spreading it on pasture fields is a practical and less expensive option. A manure storage facility eliminates the need to spread the materials on a daily basis. It provides the opportunity for spreading to be done at a time when climatic conditions and plant needs are optimal. For instance, it is not a recommended practice to spread manure on pastures with saturated or frozen soil or when the pasture area is covered with snow. Also, nutrients in waste are best used when spread on an established pasture just before or during the growing season.
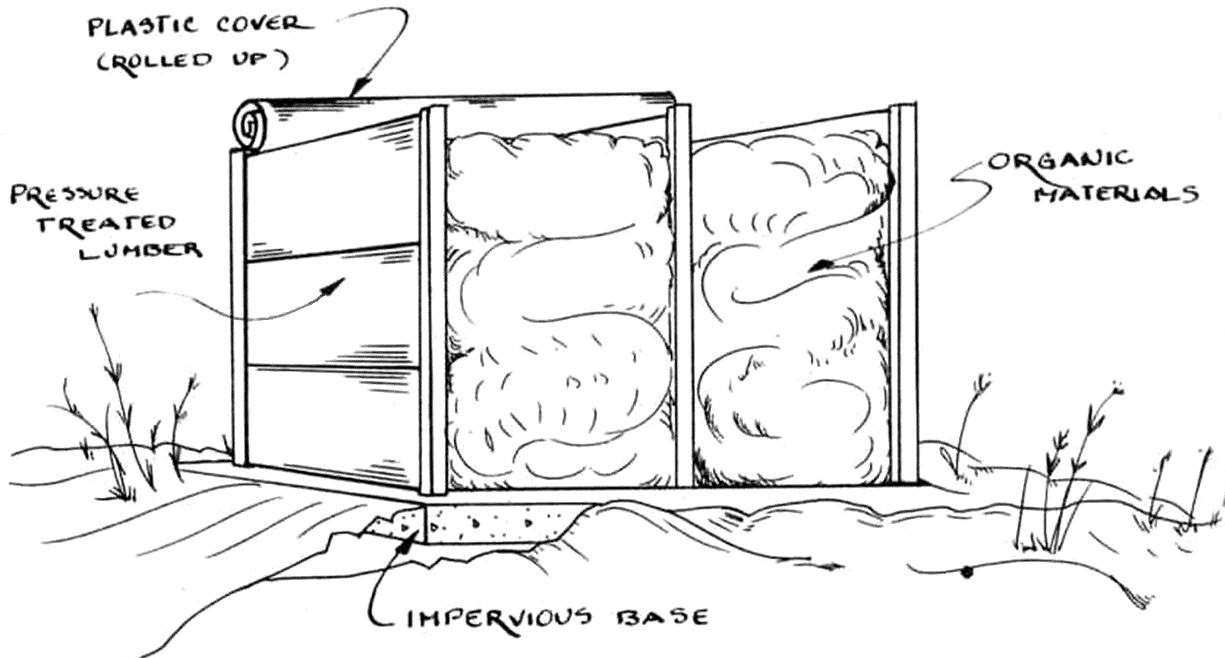
Figure 6: Illustration of two-bin compost unit
Most small horse farms do not have enough pasture area on which to spread their stored waste. In such situations, farm managers are encouraged to compost the waste. Among other things, composting addresses the core problem of excessive waste volume. Volume reduction can be between 40-60 percent! When done properly, composting destroys internal parasites, pathogens and weed seeds. Composting is an accelerated decomposition of organic materials at elevated temperatures. For an optimal composting/breaking down process, certain conditions must be present in the right amounts. These are moisture, air and an appropriate ratio of carbon to nitrogen in the material being composted. The end product is a loose, dark brown material that can be used as a soil amendment with some amount of plant nutrient.
When compost is applied to the soil, it improves the soil’s water holding capacity, increases microbial activities and improves the overall soil texture. The big question is, “How do you carry out a successful composting process?”
A composting process can be as simple as piling waste on an area with clayey soil or impervious base, covering the pile with a tarp, and turning the pile over every once in while. The impervious base helps prevent migration of nitrates into groundwater zone. The tarp keeps excess water out of the pile and reduces the chances of flies using the pile as a breeding site. It also helps to retain the generated heat—a catalyst for an accelerated composting process. In cases where there may be potential for surface runoff to wash pollutants out of the pile, a soil berm should be installed on the uphill side of the pile [Figure 5]. A more structured composting system can be in the form of a multi-cell composting bin [Figure 6]. In this case, manure that is half way composted is separated from new material to be composted. One cell is filled up at a time. While the composting process is in progress a new vacant cell is being filled with the new material.
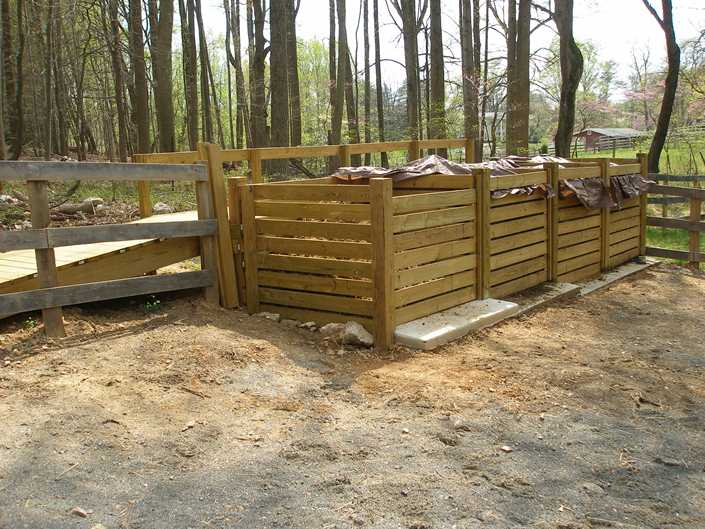
Figure 7:
Multi-cell composting facility with ramp
To make a multi-cell composting bin more user-friendly, a ramp can be added [Figure 7]. Essential features to note are the wooden planks that keep the material in place, a ramp at the back on which you can cart the waste before dumping into the cell from above, an impervious base and a tarp used as a cover.
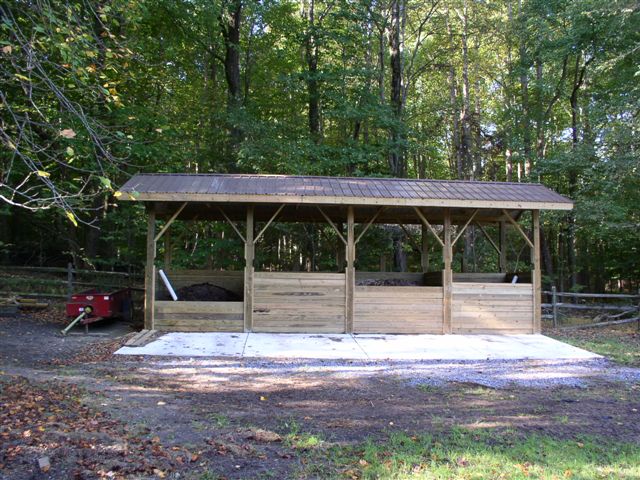
Figure 8: Composting facility with roof
For larger operations, an engineered structure can be designed and constructed [Figure 8]. This is a wooden structure with a metal roof, built on a reinforced concrete base. Such a facility can be expensive to construct. You may wish to consult with your local soil and water conservation district to find out if your operation qualifies for financial assistance and tax credit through the Virginia Agricultural Best Management Cost Share Program. At your request, a visit to an existing composting facility can be organized by your local soil and water conservation district.
Once the appropriate style of composting facility has been determined, the next step is “sizing.” Sizing the facility is a function of the number and size of horses being considered, the length of time per day they spend confined in stalls or heavy use areas and, finally, the farm manager’s choice of manure spreading intervals (in months). Your local soil and water conservation district can help you with this determination.
Composting duration varies considerably depending on the organic materials to be composted and other conditions. An ideal composting system may take eight to 12 weeks to complete. This is followed by a “curing phase,” which may last for another four weeks. The curing phase is the period during which the pile cools down, and colonies of other microorganism species emerge.
If left unmanaged, composting may take about 24 months to complete. However, putting in place certain conditions makes for an accelerated completion.
- Organic material to be composted must have the appropriate carbon to nitrogen (C: N) ratio that supports growth and activity of the microorganisms that carry out the compost, or breakdown process. These microbes use up carbon for energy and growth and nitrogen for regenerating body building protein and reproduction. Typically, materials to be composted from horse operations consist of horse waste and bedding materials that have high C:N ratio. This material should compost well just by itself, especially if the bedding material is straw. If the bedding material is sawdust, the process takes a little longer. However, it can be accelerated by adding other materials with higher nitrogen content, (e.g., grass clippings or urea) to the pile.
- The microbes need oxygen replenishment, particularly during the initial composting phase. As the microbes break down complex organic structure contained in the waste, a tremendous amount of energy in the form of heat is generated. This creates an ideal functioning environment for the microbes. They operate best in temperatures between 110°F and 150°F. At 140°F or higher, pathogens, weed seeds and fly larvae that may be in the composting pile are destroyed. However, at temperatures above 160°F the microbes will over-heat and die. Therefore, it is essential to regulate the oxygen and temperature levels by regularly “turning” the composting pile about twice a week or whenever the temperature approaches the critical range. Ideally, the internal temperature of the pile should be monitored using a long-stemmed thermometer.
- Moisture is necessary to permit biological activities and the supporting chemical processes. Moisture should be about 50 percent of the content. Estimate the appropriate moisture content by squeezing a handful of composted material. It should feel like a wet sponge after water has been squeezed out of it. It should feel damp, but not dripping! Moisture is continuously lost due to the high temperatures. Therefore, water should be added to the pile regularly, without getting it waterlogged.
Composting has many benefits:
- It reduces environmental and health risks by controlling parasite re-infestation of horses, eliminating a potential breeding site for flies and reducing the amount of manure-polluted runoff that reaches surface and ground water.
- It provides an improved and efficient manure handling system that reduces key problems such as volume and odor.
- The end product enhances soil tilth, and fertility.
Return to Index at top of page
Nutrient Management
Proper nutrient management involves timely application of determined amounts of plant nutrients and agricultural lime to maximize yield. Excessive application of nitrogen and phosphorus are agents of pollution. Excess or unused nutrients picked up by runoff enter nearby creeks, ponds or wetland areas and are eventually transported into the Chesapeake Bay.
Over-abundance of nutrients in water bodies supports excessive growth of algae and other aquatic weeds. This uncontrolled growth shades out and kills other sub-aquatic vegetation. At the end of their life cycles, the blooms of algae and weeds die and decompose, causing depletion of dissolved oxygen. Oxygen depletion, in turn, leads to odor problems and harms higher levels of aquatic life—even causing fish kills. This cycle, which is a result of nutrient enrichment in water bodies, is called “eutrophication.”
Effective nutrient management is also important for the quality of our ground water. Though out of sight, ground water is still vulnerable to NPS pollution. Polluted ground water can contain high levels of nitrate. This is particularly harmful to babies, causing Blue Baby Syndrome. Polluted ground water may also contain bacteria that can cause severe stomach upset, even in adults.
Nutrient management planning is site specific and is part of the Soil and Water Quality Conservation Plan required in the Chesapeake Bay Preservation Program. Your local soil and water conservation district office can work with you to prepare your plan; please email NVSWCD for assistance.
Return to Index at top of page
Integrated Pest Management
Integrated Pest Management (IPM) provides an ecological approach to pest management. It combines appropriate chemical, cultural and biological pest control techniques into a single plan to reduce pest population and keep damage at an acceptable level.
Implementing environmentally sound biological control techniques can reduce chemical dependency. One such technique involves releasing fly parasites near barns, manure piles or any other area of expected fly concentration. Fly parasites are harmless to animals and humans. The parasites lay their eggs inside immature fly pupae. The eggs of the parasite then hatch into larvae and feed on the inside of the pupae. One fly parasite can destroy as many as 50 fly pupae. For best results, release the parasites in spring before the fly population becomes a problem, and follow the parasite release schedule as provided by the producers.
Simply keeping the pile covered will control pests.
Pasture weeds can be another form of pest that needs to be controlled. Maintaining a healthy stand of grass in your fields can control weed problems because they choke out weed seedlings before they are established.
If weed infestation becomes a significant problem, it is important to address the conditions that support weed growth (e.g., over-grazing) in addition to chemically treating the established weeds.
Return to Index at top of page
Your Contribution to a Healthier Chesapeake Bay
The key agricultural land use practice in Fairfax County is horse keeping. Agricultural land use is a chief contributing factor to NPS pollution in the Chesapeake Bay watershed.
The Virginia General Assembly passed the Chesapeake Bay Preservation Act because of the need for improved water quality in the Bay watershed. A section of that Act stipulates that each agricultural land use operation must have a “Land Use Assessment” performed and, if deemed necessary, have an approved site specific Soil and Water Quality Conservation Plan, that consists of appropriate agricultural Best Management Practices (BMPs) that will reduce NPS pollution.
The Chesapeake Bay Preservation Act also stipulates that all parcels in agricultural use within which there is a delineated Chesapeake Bay Resource Protection Area (RPA) must maintain a vegetated buffer. Normally, the buffer component of the RPA is 100 feet wide, starting from the edge of the water body. An RPA comprises land areas closest to the shoreline of a water body that (1) have an intrinsic water quality value due to the ecological and biological processes they perform, or (2) are sensitive to impacts which may result in significant degradation of the quality of state waters. These areas include tidal wetlands and tidal shores, non-tidal wetlands connected by surface flow and contiguous to tidal wetlands or tributary streams, tributary streams, and a 100-foot wide vegetative buffer area located landward of these components.
The vegetative buffer portion of an RPA is the final pollution filtering feature for overland runoff, before it enters a surface water feature. A vegetative buffer can consist of grasses or mixed vegetation.
Good pollution control measures may allow for a narrower buffer. Following the implementation of certain or all of the pollution reduction practices recommended by your local soil and water conservation district, the district may approve encroachment of certain horse farming activities (such as pasturing) into a portion of the RPA. A minimum of 25 feet of undisturbed vegetative buffer between the limits of activities and the water feature (such as a stream or wetland area) must be maintained.
A grassed buffer used as pasture should never be grazed or mowed shorter than three inches. Restricting access of horses into an RPA prevents water pollution due to erosion and continuous deposition of animal wastes directly into the adjacent water body.
Avoid fertilizing the vegetative buffer of an RPA unless it is absolutely necessary. If it must be fertilized, do the application in small quantities over an extended period to minimize the chances of unused nutrients being washed directly into the nearest water body.
To comply with Fairfax County’s Chesapeake Bay Preservation Program, all agricultural operations—even a single horse stabled in a backyard—should have an assessment performed. The soil and water conservation district will help prepare a Soil and Water Quality Conservation Plan with implementable BMPs.